The first step in evaluating a building's energy use involves an energy audit. This consists of various home performance tests which identify opportunities to reduce energy use. Once the audit is complete, various weatherization techniques are performed to improve the energy efficiency of the building, often called 'weatherizing'. The term 'weatherization' is commonly associated with the U.S. Department of Energy's (DOE) Weatherization Assistance Program.
The program provides low-income families the opportunity to reduce energy bills by having their homes audited and weatherized. Although the DOE's program is meant for low-income households, all property owners benefit from having an energy audit performed and the necessary repairs made.
Residential energy use and loss

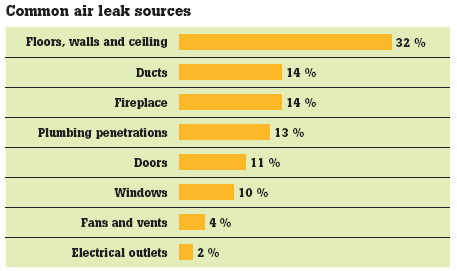
Heating and cooling the conditioned or living space accounts for almost 45 % of a typical home's energy use. Property owners can realize significant savings if proper measures are taken to control unwanted air leakage, as air leaks relate directly to heating and cooling costs. Figure 1 illustrates which areas in a home represent what percentage of air leakage. According to ENERGY STAR®, sealing and insulating the "envelope" or "shell" of your home—its outer walls, ceiling, windows, doors and floors—is often the most cost effective way to improve energy efficiency and comfort.
The value of infrared
Air leaks and insulation issues in homes often go unnoticed simply because we cannot see them. That is unless infrared or thermal imaging is used. Now affordable, thermal imaging has become widely accepted as a 'must have' tool for energy auditing and weatherization.


Energy auditors and weatherization professionals utilize thermal imaging because it provides a fast and easy way to pinpoint and document exact locations of problems. In an industry where speed and accuracy is vital, infrared allows for faster inspections and more detailed documentation. Many traditional auditing tools provide a general idea of where problems are, but fall short of pinpointing them.
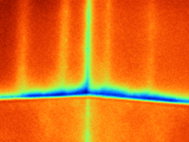
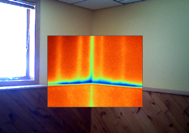
Perhaps the most valuable part of infrared inspection is the ability to document and report findings. All Fluke thermal imagers include IR-Fusion®; a technology that combines an infrared image with a visual image for enhanced identification, analysis and reporting. By incorporating the visual reference image, clients and/or contractors tasked with making repairs can easily relocate problems after an audit is complete.
Thermal imaging can also be used to validate the effectiveness of repairs and improvements such as caulking, filling voids with spray foam and adding insulation by performing a follow-up infrared inspection.
Air leak inspections
Controlled air exchange is necessary for occupant safety, but most structures waste significant energy through excessive, uncontrolled air leakage. Remedies for leaks can be simple, but finding them without the use of infrared technology remains a challenge.
According to ASTM E1186, for best air leak inspection results, a temperature difference, or Delta T, of at least 3 °F from the inside to the outside of a structure should exist (the larger the difference, the better). For this reason, it's easiest to conduct inspections during periods of intense heat or intense cold.

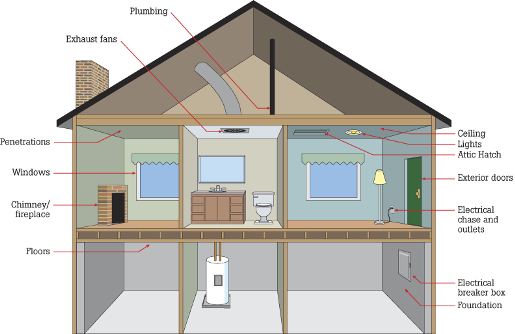
Significant air leaks tend to occur near attics and basements due to the stack effect. The stack effect occurs when warm air rising in a home creates an area of low pressure at the lower levels and high pressure near the roof. These pressure differences force warm air to escape from the top and cold air to enter near the bottom. Other common areas of air leakage are highlighted in Figure 2.
Air leak inspections are greatly enhanced by the use of a blower door. Auditors and inspectors have long used blower doors to measure the overall air exchange rate or air tightness of a structure. Blower doors create a pressure difference (usually negative) from the inside to the outside of the structure. By creating a pressure difference, air leaks are exaggerated and the effect the moving air has on the surfaces around the leaks is exaggerated as well. When used in conjunction with blower doors, thermal imagers more easily detect air leaks as there is greater difference in temperature on the surfaces surrounding the air leak source. This exaggerated temperature difference also allows infrared inspections to take place more often throughout the year as the blower door reduces the required Delta T.
Insulation inspections
Problems with insulation that lead to energy loss often include missing, inadequate, settled, and/or wet conditions. All reduce the effectiveness of insulation and can lead to thermal and/or air bypass.
According to ASTM C1060, for best insulation inspection results, a temperature difference, or Delta T, of at least 18 °F from the inside to the outside of a structure should exist (the larger the difference, the better).
It's much easier to interpret findings if the type of insulation is known. Knowing the insulation type enables an auditor to prepare for issues commonly associated with certain insulation types. For example, blown-in insulation is notorious for settling over time.

Moisture
Moisture and condensation often go hand-in-hand with air leaks in a structure, as air can provide a means for moisture to travel. Moisture, if not properly remedied, can lead to building damage, reduced insulation effectiveness and mold.
Thermal imagers are very effective tools for identifying moisture. Water has a high thermal capacitance, meaning that it efficiently absorbs and stores energy. The thermal capacitance of water or the effects of evaporative cooling (usually a 2 °F to 5 °F surface temperature difference) help reveal the extent of moisture damage, even when the surface feels dry to the touch. All suspected moisture should be validated with a moisture meter.
Inspection considerations and procedures
- Knowledge of building methods and materials is critical. Infrared audits are best performed by someone that understands how buildings work and how they are built.
- Thermal inspections can be performed in both warm and cold weather. By utilizing the HVAC system, adequate Delta T can be mechanically influenced. However, always ensure inside temperature stabilization by turning off the HVAC at least 15 minutes before beginning an inspection.
- To ensure a thorough inspection, work systematically. Follow a route and make sure to scan both interior and exterior walls. Also, it is always best to record appropriate visible, voice, or written annotations during the process to ensure that you have adequate information for the final reporting.
- Thermal imagers can be operated in auto or manual temperature scaling modes. For best results and to ensure all issues are identified, utilize the manual scaling mode. Keep the span narrow and adjust the level as necessary.
- Solar loading and wind are environmental factors that must be considered. Solar loading occurs when one or more sides of a structure are uniformly heated by the sun, causing temperature differences to be masked over. Similarly, wind moving over a structure, can wash away thermal signatures, or create unexpected pressure differences which can leave some problems undetected.
- Thermal sensitivity, or NETD (negative electron-transfer dissociation), is a key factor to consider when purchasing a thermal imager for building inspections. The NETD should be at least 0.1 °C (100 mk) at 30 °C or better. The more sensitive the imager, the easier it will be to identify anomalies. Highly sensitive imagers are more effective for conducting inspections throughout the year or when minimal Delta T is present.