This guide will take you through the basic anatomy of a digital multimeter. The more familiar you become with your own digital multimeter, the more valuable it will become as you are able to maximize its capabilities.
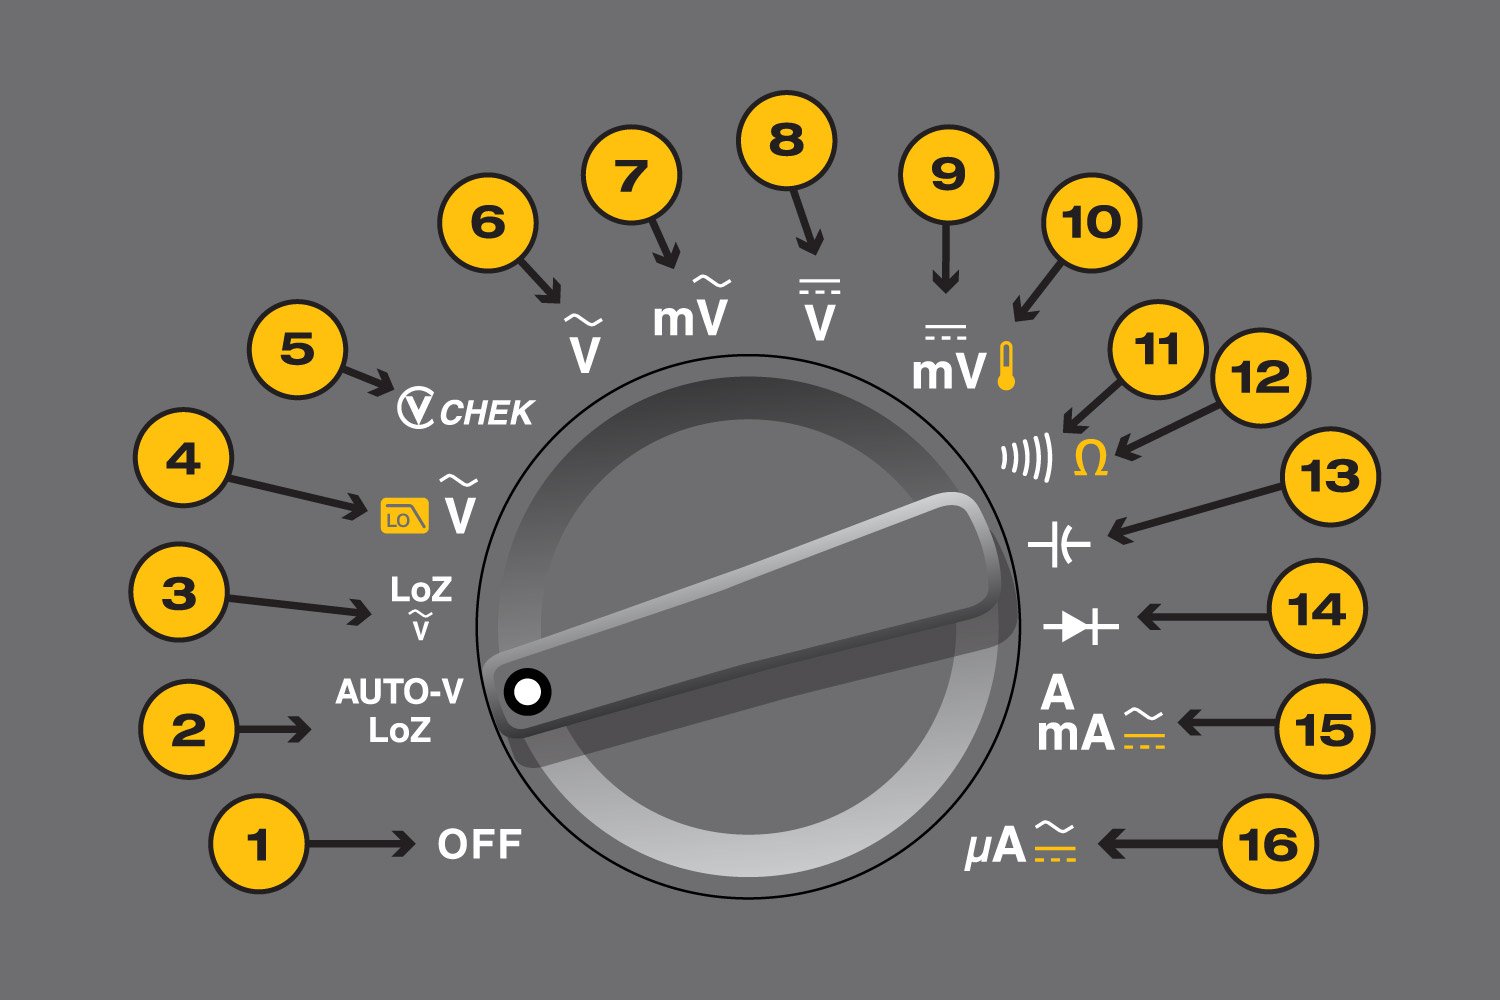
Digital multimeter dial

This is a composite image and not an actual dial. It shows a variety of functions found on multiple Fluke digital multimeter dials. No single model contains all these functions. On many models, some function icons are displayed in yellow. This indicates the digital multimeter’s yellow function button must be pressed to select those measurements.
- ON/OFF switch
- AUTO-V/LoZ: prevents readings due to ghost voltage; found on the Fluke 114
- AC voltage/LoZ: uses low-input impedance
- AC voltage with low-pass filter
- VCHEKTM: permits simultaneous testing for voltage or continuity; found on the Fluke 113
- AC voltage
- AC millivolts
- DC voltage
- DC millivolts
- Temperature
- Continuity: when combined with sound button
- Resistance
- Capacitance
- Diode test
- AC, DC amps and milliamps
- AC, DC microamps
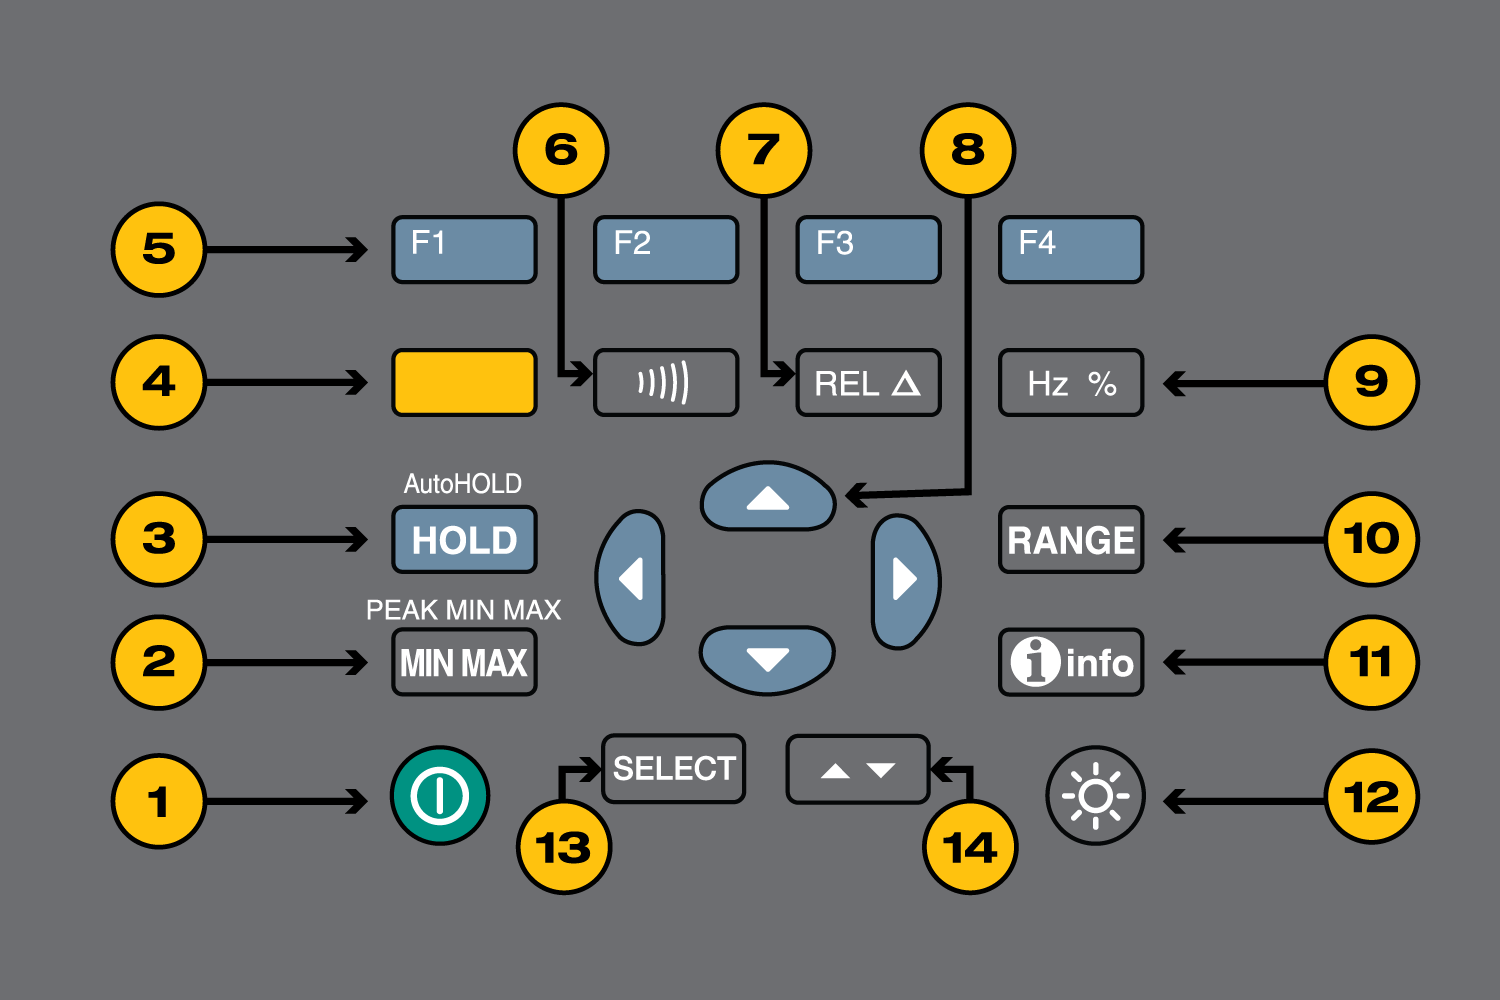
Digital multimeter buttons

This is a composite image. Actual assortment and variety of buttons may vary by digital multimeter model.
- On/off button.
- Min Max: Stores input values; beeps when a value is breached and a new value is set. Peak Min Max: Captures intermittent or transient events that occur on a monitored signal; captures the highest value in a very short duration (microseconds).
- Hold: Captures and holds a stable measurement. AutoHOLD: Captures a measurement, beeps, and locks the measurement on the display for later viewing. Automatically updates with a new stable reading.
- Function button: Yellow button activates secondary functions shown in yellow icons around the dial (often temperature and capacitance).
- Menu buttons: Activates functions related to the menus to the display.
- Audible signal: Activates continuity beeper.
- Relative (REL) mode: Stores existing reading (a delta) and resets display to zero. Sets a relative reference point to measure against the next reading.
- Cursor buttons: Permit data entry, menu scrolling, display adjustment, and other tasks.
- Frequency and duty cycle measurement.
- Range: Switches to manual mode and cycles through all ranges. Autoranging restored when pressed for two seconds.
- (i)info: Displays information about present function or items on the display at the moment the button is pressed.
- Brightness: Switches display backlight between off, low and high.
- Select: (3000 FC only) Selects/deselects the highlighted wireless module in the display. Hold for one second to bind all selected modules to the meter and stop the discovery procedure.
- Up/down: (3000 FC only) Moves the highlight in the display to the next wireless module shown in the display.
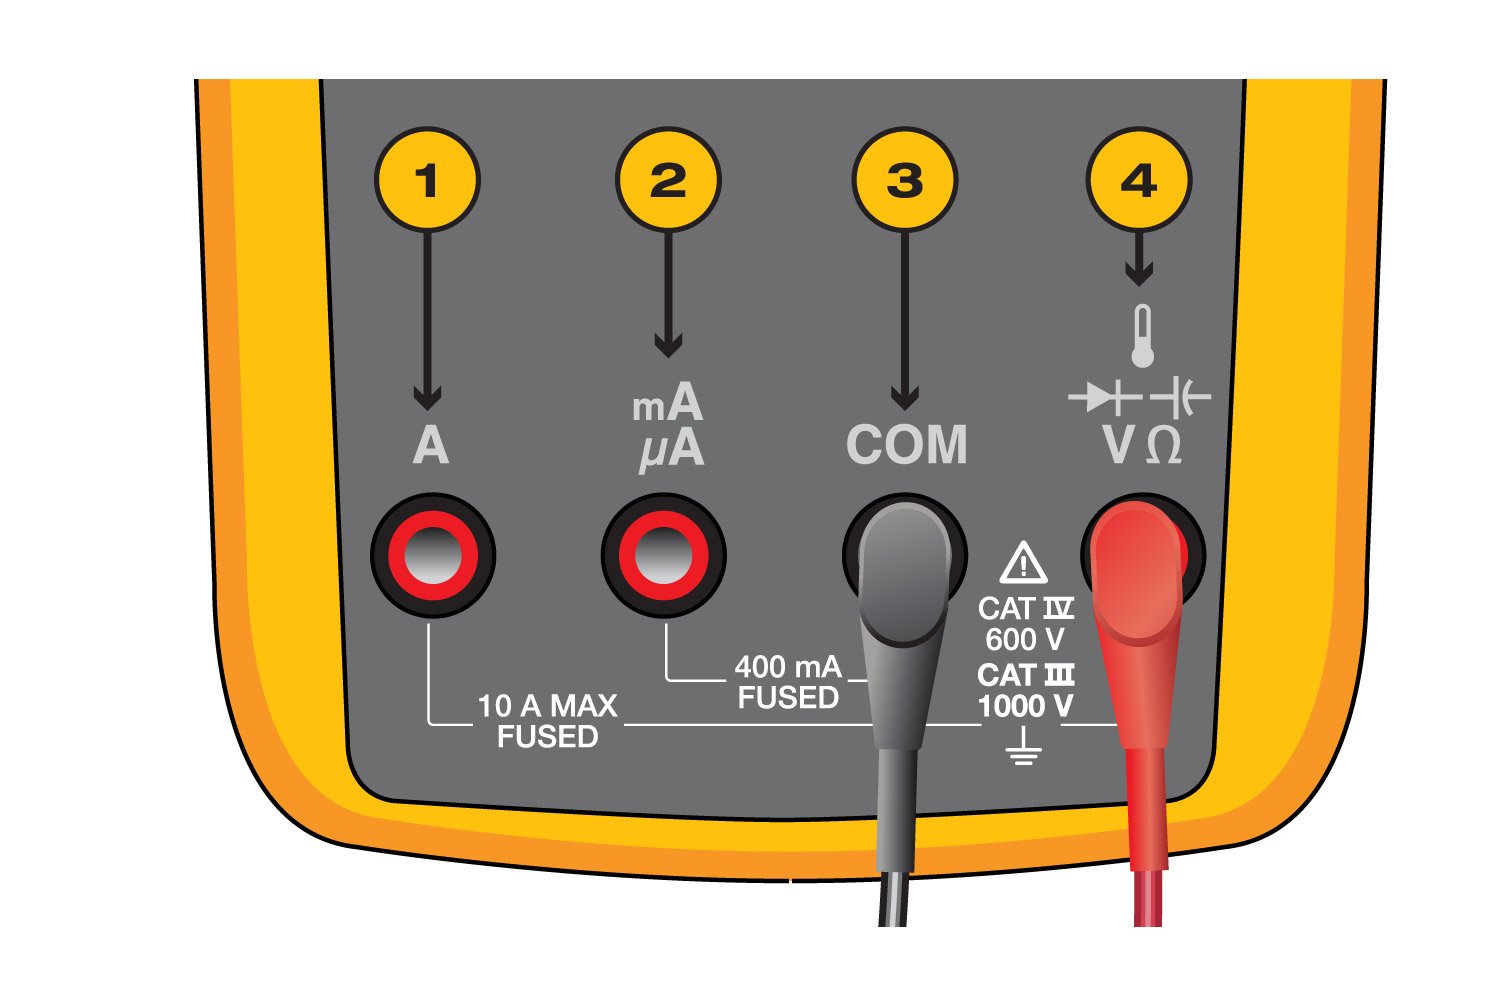
Digital multimeter jacks

Not all meters off an input jack for milliamps (mA) and microamps (μA).
- A (amps)
Red test lead input for:- Current measurements of up to 10 A.
- Current measurements of frequency and duty cycle.
- Optional mA output current clamp for current measurements of 400 A or more, up to the limit of the clamp.
- mA, μA (milliamps, microamps)
Red test lead input for:- Current measurements of 0 μA to 400 mA (up to 600 mA for 18 hours).
- Current measurements of frequency and duty cycle.
- Optional mA output current clamp for measurements of up to 600 A ac.
- COM
Black test lead input for:- All measurements.
- Low/negative connection for circuit measurements or accessories.
- Alternatively known as “return terminal.” COM is short for common.
- Voltage (V), resistance (Ω), diode test (arrow plus symbol), capacitance (other symbol), temperature.
Red test lead input for:- Measurements for voltage, resistance, diode, capacitance, frequency, duty cycle and, if available, temperature.
- Also accepts red clamp lead when using Halle Effect-style current clamps.
Important: The input jack chosen for the red test lead MUST match the parameter selected on the dial. Dial set on ac volts? Make certain the red test lead is plugged into the jack designated for voltage and not current. If not, the meter, equipment, and technician are all at risk.
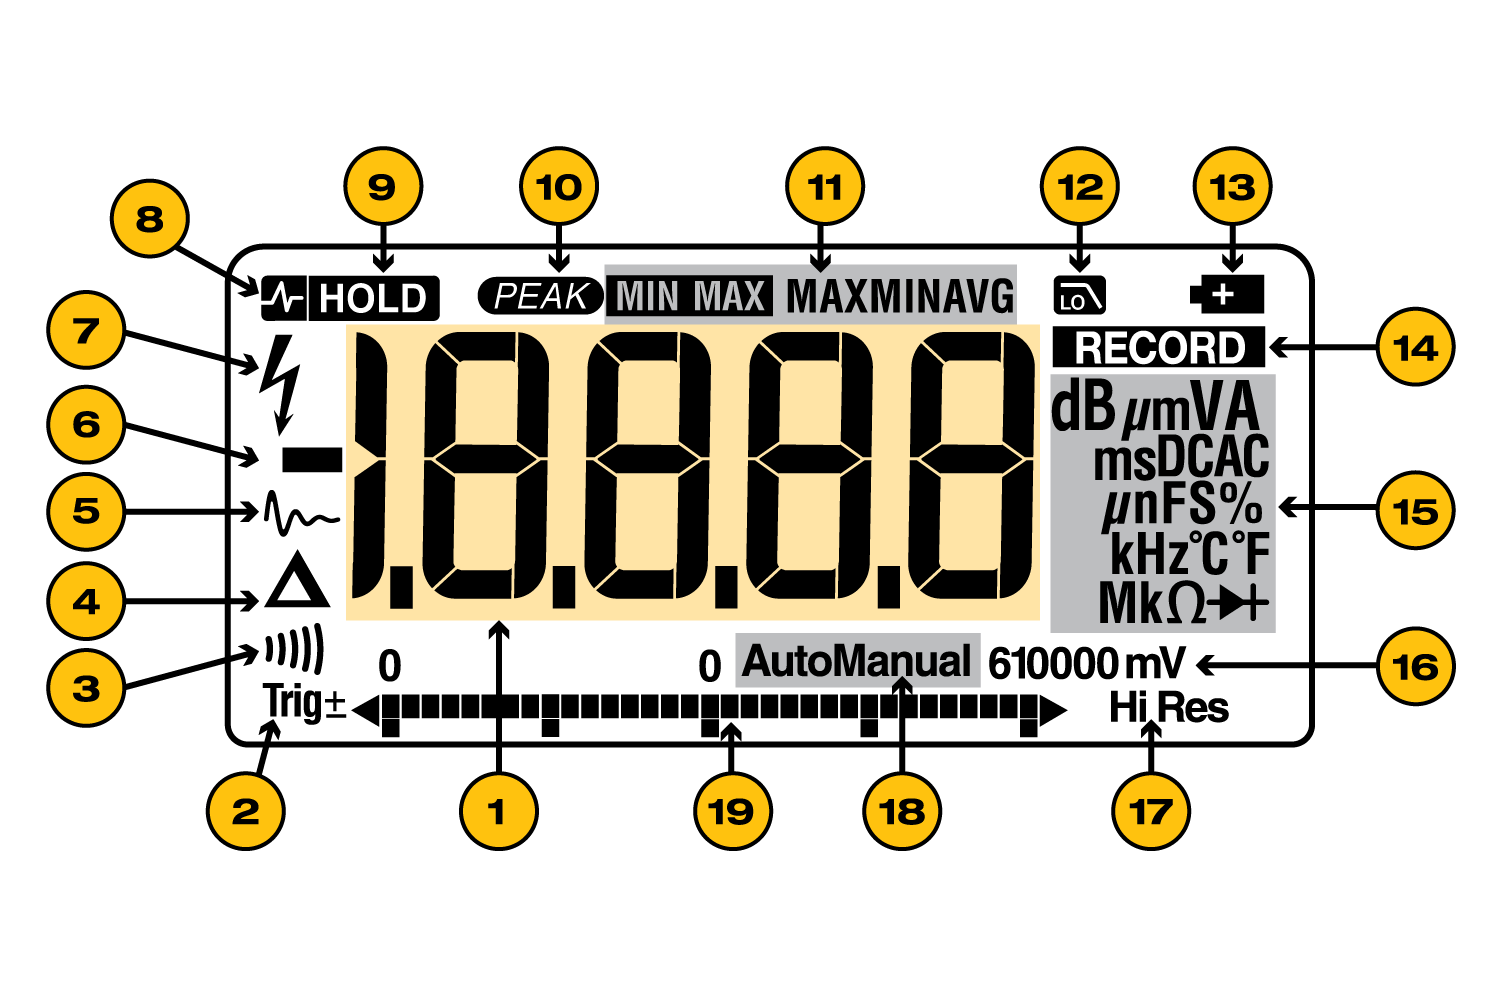
Digital multimeter display

| Identifier | Reference | Main | Secondary | Convenience | Specialized |
| 1 | Digits | x | |||
| 2 | Polarity | x | |||
| 3 | Continuity beeper | x | |||
| 4 | Relative (REL) mode | x | |||
| 5 | Smoothing | x | |||
| 6 | Negative reading indicator | x | |||
| 7 | High-voltage input (if 30 V or greater, ac or dc) | x | |||
| 8 | Auto Hold active | x | |||
| 9 | Display hold | x | |||
| 10 | Peak Min Max mode | x | |||
| 11 | Min Max recording | x | |||
| 12 | Low pass filter mode | x | |||
| 13 | Low battery indicator | x | |||
| 14 | Recording mode | x | |||
| 15 | Measurement units | x | |||
| 16 | Selected range | x | |||
| 17 | High-resolution mode | x | |||
| 18 | Auto or Manual range | x | |||
| 19 | Analog bar graph | x |