Surprisingly, many people believe that once they have their temperature probes calibrated, all they have to do is hook it up to the readout, load the coefficients, and start measuring. This approach may save time initially, but can lead to significant losses, sometimes even millions of dollars, if the calibration isn't checked when you get it back. A simple shift in a PRT probe during shipping, which wasn't checked prior to use, was found to be the root cause in one such instance.

What does it mean to “close the loop”?
“Closing the loop” is completing the calibration process a probe should undergo before it’s used. It's not just about sending the probe out for annual calibration.
The process begins with an initial measurement before the probe is shipped out for calibration, ensuring a record of its status at that moment in time. This measurement closes the loop on the work the probe has done and is referred to as the send-off measurement.
When the probe is received back from calibration, another measurement is taken to verify that the probe didn’t shift during return shipment. This is the return measurement.
Both the send-off measurement and return measurement are compared with the calibration report. This enables you to monitor the status of the probe, and it also provides a crosscheck between the calibration lab and your lab.
Measuring a probe before and after shipment may be the most important measurements in the overall calibration loop. Many probes and instruments are damaged beyond repair while in shipping. Make sure your work is closed out before shipping a probe.
How do I determine if a probe is within tolerance?
Just because the probe was calibrated and given a calibration certificate doesn’t mean it was in tolerance. This might sound obvious, but it often comes up as a common misconception. Someone who is surprised by this always follows up with the question, “How do I know if the probe is in tolerance?”
Basically, the tolerance status of a probe is calculated by comparing the new calibration with the previous calibration. It's important to understand that calibration doesn't automatically guarantee that the probe is within tolerance.
How can “out of tolerance” be avoided?
The goal of any measurement program is to ensure consistent, accurate results; make sure that everything always works, and nothing is out of tolerance. Of course, the better the measurement program, the less often instruments are out of tolerance. Measuring a probe as it is sent out for calibration and when it is received from calibration is good, but the probe also needs to be monitored as it is being used.
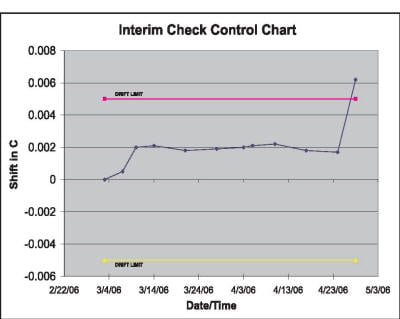
Regular monitoring of the probe as it’s in use is as important as the pre- and post-calibration measurements. Temperature probes are often fragile, requiring careful handling to maintain their performance. Manufacturers may spec a probe’s long-term drift, but the only sure way to know the performance of a probe is by implementing interim checks and control charts (see Figure 1.) Regular, interim checks and control charts can help monitor a probe's performance more accurately than relying solely on manufacturer's specifications. Regular checks can save significant amounts of time and money in the long run.
How often should the probe be checked?
There are no established rules that define how often an interim check should be done. The frequency should really depend on the specific requirements and comfort level of the user. One approach to establishing an interval is by deciding the largest recall interval you are comfortable with and set the interim check interval based on that.
For example, if you calibrate 10 instruments a week with your temperature probe, then a weekly interim check may be sufficient. The largest risk would be the recall of 10 instruments. A daily interim check would limit the risk to recalibration of two instruments.
At each interim check, record and graph the data to create a control chart. As you add control lines to the chart, you’ll begin to see when a probe is drifting out of the specified limits (See Figure 1.)

Figure 1. Sample control chart showing interim checks and shift in temperature during the time monitored.
The sample control chart shows the data of a probe measured about every seven days. On 4/28/06 the probe’s shift was verified to be about 0.006 °C, which exceeds the process limit. Since the interim monitoring was done so recently, only four days of cal work may have to be recalled due to the shift.
What temperature points should be measured?
The choice of temperature points depends on the specific circumstances, but they should be easily achievable and repeatable.
The triple-point of water (TPW), 0.010 °C, is frequently used for closing the loop in probe calibrations. At Fluke Calibration, the TPW is measured multiple times in every platinum resistance thermometer (PRT) calibration to monitor the probe as it is calibrated.
The TPW is very important in PRT calibrations because it can be used to troubleshoot several types of problems that affect PRT performance. Not only is the TPW included in every ITS-90 calibration, but it is also used in every ITS-90 measurement as well. The ITS-90 was designed to allow the user to update the probe’s resistance at the triple-point of water (RTPW). Updating the RTPW coefficient can also help reduce errors due to probe drift. For these reasons, the TPW is the first choice for a quick check to verify and close the loop on a PRT.