Signals to and from automated process control systems must transmit information accurately and reliably. Whether it's an old-school analog 4 to 20 mA signal communicating the fluid level in a storage tank or an Ethernet/IP™ signal relaying digital instructions to a conveyor system on the plant floor, electrical signal integrity is the bedrock upon which programmable automation controller functionality, reliability, and accuracy depends
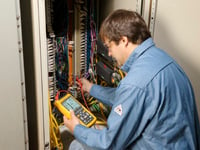
The heat, dust, corrosive chemicals, moisture, and vibration common to many work environments can degrade wiring and connections, however, and a harsh electrical environment can degrade signal quality. As a result, effective troubleshooting may require an examination of wiring, connections, and the electrical characteristics of the signals as they traverse the system (Figure 1).
Troubleshooter's toolbox
Tools for testing electrical signal integrity range from digital multimeters to devices specially designed for testing the electrical characteristics of analog and digital circuits. (Note: Tools that analyze signals as data are not discussed in this article.) Battery-operated devices can make "floating" measurements in which no point of the measurement instrument is at ground (earth) potential, which helps to ensure measurement accuracy and that the measurement process does not degrade network performance.
- A digital multimeter can make basic electrical measurements (such as continuity, resistance, and capacitance) that are useful basic tests of wire and cabling integrity.
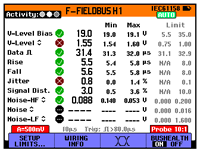
- Oscilloscopes enable troubleshooters to inspect signal waveforms, making it possible for them to see dynamic electrical characteristics such as noise, distortion, and signal amplitude. Oscilloscopes designed for network electrical testing have the capabilities of both digital multimeters and oscilloscopes, along with additional features specifically for network troubleshooting. Some specialized network oscilloscopes can measure not only signal characteristics; they can perform detailed waveform analysis (measuring baud rate, jitter, rise and fall times), capture signal disturbances and anomalies, and tell the operator if the measured values are within an acceptable range for common industrial networks.
- Dedicated analog troubleshooting tools include a variety of tools for process calibration and documentation (for pressure, temperature, and milliamp loops, for example) in the field, and pumps for testing pressure and vacuum. A number of these tools, such as process milliamp clamp meters, have unique measurement capabilities for checking analog I/O signals.
Start with the basics
Start by narrowing the scope of the troubleshooting task by clarifying what's working, what's not, and exactly what the symptoms of the problem are.
Check the service history.
Has anything been serviced or reconfigured recently? Was anything added or modified just before the trouble began? Often, troubles in a previously healthy system have been introduced by modifications or repairs.
Look for related events.
Investigate whether disturbances can be linked to specific events or devices, such as a motor starting, or a light being turned on.
Make a visual inspection.
Check that wiring is correct and intact (no breaks, fraying, or compromised insulation). Check that terminations are tight, free from corrosion, and terminated with the right impedance (if required). Verify that the lengths of wiring runs are within specification, have correct cabling and shielding, and are isolated from power conductors (especially motor drives).
Make basic electrical measurements.
As needed and possible, make measurements to verify that both signal and shielding connections are solid and correct. Measurements (from the basic to the advanced) include:
- Resistance and continuity in wiring runs. Ensure that a signal path exists and, to avoid excessive signal attenuation, that resistance is within specification (Figure 2).
- Resistance between wiring, shields, and ground. Make sure that wiring and shields are isolated and that shields are grounded correctly.
- Capacitances between conductors and shields. Capacitance values should be consistent with the manufacturer's specification for the type and length of cable, and with the network type.
- Supply voltages. Verify that equipment power is within specification, especially if weak signals or signals with lower amplitude than expected are detected.
Document your findings.
Carefully document each measurement, noting what was measured, where, and under what conditions.
Digital troubleshooting on the physical layer by inspecting digital waveforms
Digital signals are usually visualized and discussed in their ideal form: perfect waveforms with perfect timing and other characteristics. The reality, especially in industrial environments, can be quite different.
To inspect digital waveforms, connect an oscilloscope to the I/O link and inspect the waveforms.
- Verify that signal waveforms are well formed, not overly attenuated, and free from excessive noise.
- Transitions that are too slow (have slow rise times) may indicate that a conductor is too long, that the cable is damaged or of the wrong type, or that a required terminator is broken or missing.
- Pulse overshoot (a pulse exceeds 100% amplitude) is also an indication of out-of-spec impedances within a network.
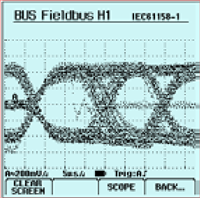
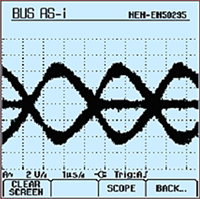
- Increase oscilloscope image persistence and adjust triggering to get an "eye pattern" on the display (Figure 3). (A dedicated network signal inspection tool may have an automatic eye pattern setting.) This scope mode gives a user excellent insight into bus activity and overall signal quality.


Figure 3. The oscilloscope display shows "eye patterns" for noisy and clean digital signals. 
Figure 4. Measuring current on a 4-20 milliamp process control loop is part of analog troubleshooting on the physical layer. - Slow-changing edges do not necessarily indicate network trouble, but big differences in speed transition require further investigation.
- If only an occasional curve with an obviously different waveshape is captured, chances are that a single device has hardware problems or is not powered properly.
- A wide spread between high and low signal levels may indicate signal attenuation on the line.
- Inconsistent distribution of signal levels may signal a discontinuity in the network, or a device that is putting out a signal that is too low in amplitude.
Eye patterns also enable an analysis of the noise levels on the network. Noise can interfere with the signal and corrupt or halt communications. Poor connections in the cable shield or disconnected shielding are frequent causes of disruptive levels of noise.
Analog troubleshooting on the physical layer
Although the trend is toward digital, analog systems - particularly 4-20 milliamp (mA) process control loops - are still found everywhere, especially in pharmaceutical, refining, and other process manufacturing areas (Figure 4). The multimeter and oscilloscope have a role to play for measuring and visualizing the electrical characteristics of analog systems, but dedicated tools that can not only measure analog level and control signals but can also source, simulate, and document them are the norm.
Troubleshooting 4-20 milliamp process control loops
4-20 mA control loop signals represent a process variable (such as pressure or valve position) with an analogous electric current. To troubleshoot:
- Measure the 4-20 mA signal. If loop current is not as expected, check three likely causes: a bad loop power supply, broken/disconnected/shorted wires, or faulty instrumentation.
- Measure the loop power supply at both the transmitter and at the power supply. There should be about 19 to 23 V across the transmitter. The power supply should be close to 24 V.
- If the loop supply measurements look suspicious, do a substitution test using the test tool's 24 V supply.
- Check the wiring. Check terminations for connections with higher-than-normal resistance.
- 5. Test the PAC's I/O card by sending a mA signal to the input of the controller and checking for the correct indication.
- Send a mA signal to the final control element (a valve positioner, for example). If the element performs as directed, the problem lies with the wiring or the controller output signal. If it does not, the fault is likely with the final control element.
Loop malfunctions
If the problem is not a dead loop but an inaccurate one, likely causes include a bad I/O card on the PAC or a bad final control element. It's usually best to start by doing a field check of the transmitter, the local or remote indicator, or the final control element.
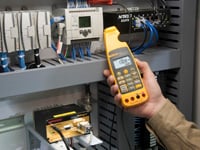
For a final control element, use a milliamp clamp-on meter to measure loop current and compare the value to the local position indicator on the valve or other final control element. Relay that information to the operator to verify findings.
In the case of a measurement loop, use a clamp meter to measure loop current, then check with the operator to see how well the value indicated on the control panel agrees with the actual loop current. This gives a quick check of the PAC I/O card that handles that loop. It's also possible to send a known signal to the control room - as before, compare the value read by the operator to the actual current in the loop.
Checking PAC I/O cards
To troubleshoot 4-20 mA input cards, disconnect the process loop, feed in a known signal current, and compare it to the value shown at the readout. Check voltage input cards in a similar way, by feeding in a known signal voltage.
If the control system does not respond, check the input resistance of the I/O card. (250 ohms is a typical value.) If the resistance reading shows an open circuit, the I/O card may be defective or have a blown fuse.
Analyzing data and drawing conclusions
A single measurement sometimes reveals the source of a problem. Sometimes a careful analysis of a range of measurements is required, which is why it is important to record measurement values as the troubleshooting process proceeds. Sometimes, analyzing measurements raises additional questions, which can then be the basis for additional tests, bringing investigators closer to finding solutions to system problems.
