Calibration is configuring and verifying a measuring instrument's accuracy to ensure its readings match a known standard. It’s a foundational practice across healthcare, electronics, manufacturing, and environmental monitoring.
Instruments naturally experience wear, drift, and environmental impact over time, which can compromise their performance. Calibration restores their accuracy and ensures consistent, reliable operation that aligns with regulatory and safety standards.
Table of Contents:
What is the Purpose of Calibration?
How is Calibration Performed?
Why is Calibration Important?
Where are Calibrations Performed?
When are Calibrations Performed?
Who Performs Calibrations?
Looking for calibration information for consumer products?
What is the Purpose of Calibration?
Calibration is the act of comparing a device under test (DUT) of an unknown value with a reference standard of a known value.
A person typically performs a calibration to determine the error or verify the accuracy of the DUT’s unknown value.
As a basic example, you could perform a calibration by measuring the temperature of a DUT thermometer in water at the known boiling point (212 degrees Fahrenheit) to learn the error of the thermometer. Because visually determining the exact moment that boiling point is achieved can be imprecise, you could achieve a more accurate result by placing a calibrated reference thermometer, of a precise known value, into the water to verify the DUT thermometer.
A logical next step that can occur in a calibration process may be to make a corrective adjustment or to true-up the instrument to reduce measurement error. Technically, corrective adjustment is a separate step from calibration. (Correction and compensation are covered in more detail in the Calibration Steps section below.)
For a more formal definition of calibration, we turn to the BIPM (Bureau International des Poids et Mesures or International Bureau of Weights and Measures, www.bipm.org), based in France, which is the coordinator of the worldwide measurement system and is tasked with ensuring worldwide unification of measurements.
BIPM produces a list of definitions for important technical terms commonly used in measurement and calibration. This list, referred to as the VIM (International Vocabulary of Metrology), defines the meaning of calibration as an “operation that, under specified conditions, in a first step, establishes a relation between the quantity values with measurement uncertainties provided by measurement standards and corresponding indications with associated measurement uncertainties and, in a second step, uses this information to establish a relation for obtaining a measurement result from an indication.” This definition builds upon the basic definition of calibration by clarifying that the measurement standards used in calibration must be of known uncertainty (amount of possible error). In other words, the known value must have a clearly understood uncertainty to help the instrument owner or user determine if the measurement uncertainty is appropriate for the calibration.
International System of Units (SI) – The Top Level of Known Measurement Standards
How do we arrive at measurement standards of known values against which we calibrate our devices under test? For the answer, we turn to the International System of Units, abbreviated “SI”, which is derived from “Le Système International d'Unités” in French. The SI consists of seven base units which are the second, meter, kilogram, ampere, kelvin, mole and candela.
The seven base SI units are derived from quantities in nature that do not change, such as the speed of light.
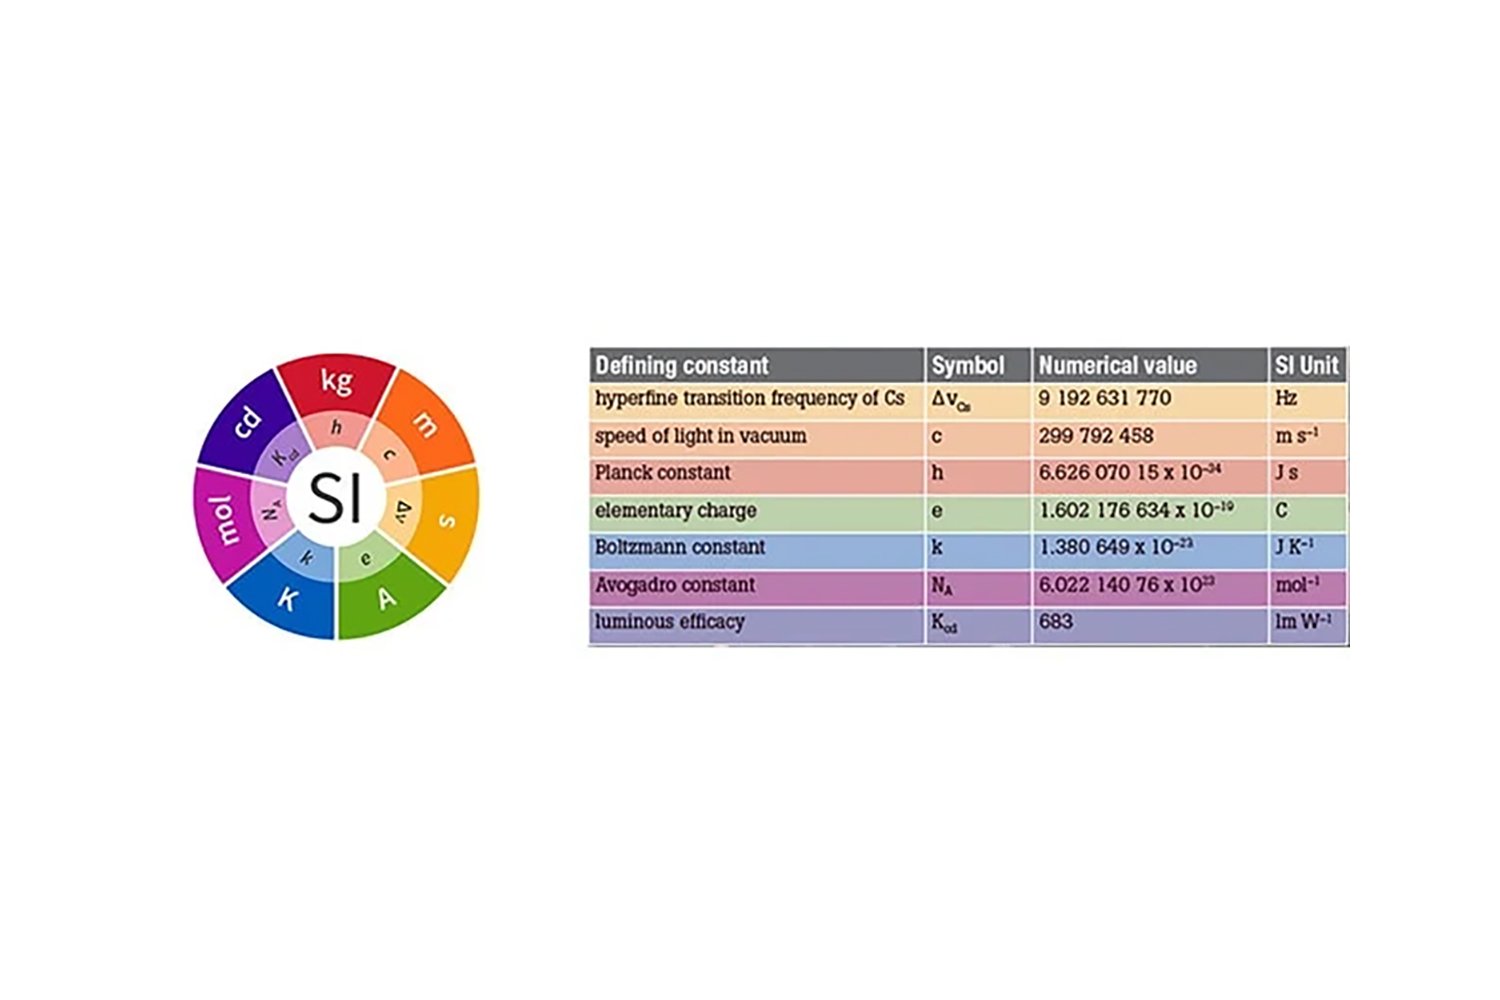
The SI Units and Constants
Until 2019, the kilogram was the exception where it was defined by a cylindrical, metallic alloy artifact known as the International Prototype of the Kilogram (IPK) or “Le Grand K”. Keeping that artifact from influences that might even slightly change it was so important that it was carefully and securely stored under double glass enclosure in a vault in Paris that required 3 keys to open. Despite best efforts to maintain the artifact, it was found that, over time, it lost some mass - equivalent to about a grain of sand. And, so with great fanfare, it was announced on World Metrology Day in 2019 that the definition of the kilogram would shift from being based on the metal artifact in Paris to being based on the Planck Constant, a constant of nature which does not change and can be accessed anywhere in the universe. Learn more about the new definition of the kilogram.
It is interesting to note that the definition of some SI units has improved over time. For example, consider the historical changes to the definition of one second:
- 1874 - 1956: 1/(86,400) of a day
- 1956 - 1967: The fraction 1/(31,556,925.9747) of the tropical (epoch) year of 1900 based on astronomical observations between 1750 and 1892
- 1967 - 1997: the duration of 9,192,631,770 periods of the radiation corresponding to the two hyperfine levels of Cesium (Cs) 133
- 1997 - 1999: added at rest approaching 0 K
- 1999 - Present: included corrections for ambient radiation
Using the latest definition, the second is realized by the weighted average of atomic clocks all around the world.
At this point, it should be pointed out that the base SI units can be combined per algebraic relations to form derivative units of measure important in calibration such as pressure (Pounds per Square Inch or PSI). In this case, pressure is derived from the meter and kilogram base SI units.
The SI was created by resolution of the General Conference on Weights and Measures (CGPM), an intergovernmental organization created via the Treaty of the Meter, or Convention of the Metre, signed in 1875 in Paris. The Treaty of the Meter also created organizations to help the CGPM, namely the International Committee for Weights and Measures (CIPM), which discusses, examines and compiles reports on the SI for review by the CGPM and the BIPM whose mission we mentioned above. You can find and review CGPM resolutions at the BIPM website. Today member states of the CGPM include all major industrialized countries.
Calibration Interoperability
A key benefit of having the BIPM manage the SI on a worldwide basis is calibration interoperability. This means that all around the world, we are using the same measurement system and definitions. This allows someone in the U.S. to purchase a 1-ohm resistor in Australia and be confident that it will be 1 ohm as measured by U.S. Standards, and vice versa. In order to have interoperability, we need to have all of our measurements traceable to the same definition.
The Calibration Traceability Pyramid – Getting the SI into Industry
Now that we have the SI reference standards, how do we efficiently and economically share them with the world?
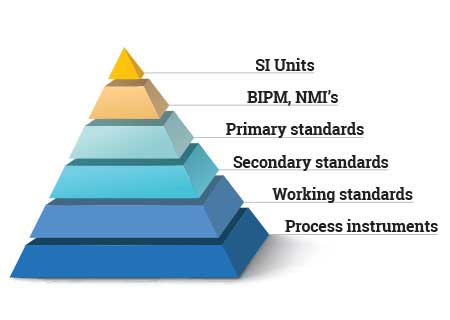
Think of the SI at the top of a calibration pyramid where the BIPM helps pass the SI down to all levels of use within countries for the fostering of scientific discovery and innovation as well as industrial manufacturing and international trade.
Just below the SI level, the BIPM works directly with the National Metrology Institutes (NMIs) of member states or countries to facilitate the promotion of the SI within those countries.
The NMI of the United States is the National Institute of Standards and Technology (NIST), a non-regulated federal agency of the United States Department of Commerce. Fluke Calibration works with NMIs around the world where it does business. You can see a list of NMIs and other metrology organizations by country at the BIPM's NMI page.
Because it’s not affordable, efficient or even possible for everybody within a country to work directly with their NMI, NMI-level calibration standards are used to calibrate primary calibration standards or instruments; primary standards are then used to calibrate secondary standards; secondary standards are used to calibrate working standards; and working standards are used to calibrate process instruments. In this way, as illustrated in the image below, references to the SI standards can be efficiently and affordably passed down the calibration pyramid through the NMI, into industry as needed.
In some rare instances, an SI unit can be realized directly by a laboratory using a special instrument that implements physics to achieve the measurement. The Quantum Hall Ohm is an example of this type of device. While it is directly used in several calibration laboratories in the United States, the NMI is still involved by helping ensure the device is measuring correctly.
Learn more about calibration standards.
Calibration Traceability
The lineage from the lowest level of the calibration pyramid all the way up to the SI standards can be referred to as “traceability”, an important calibration concept. Stated another way, traceability, or traceable calibration, means that the calibration was performed with calibrated reference standards that are traceable through an unbroken chain back to the pertinent SI unit, through an NMI. Calibration traceability may also be thought of as the pedigree of the calibration.
Traceability is also important in test and measurement because many technical and quality industry standards require measurement devices to be traceable. For example, traceable measurements are required in the medical device, pharmaceutical, aerospace, military, and defense industries as well as in many other manufacturing industries. And, traceable calibration always helps to improve process control and research by ensuring measurements and resulting data are correct.
As with other topics associated with calibration, many technical requirements have been developed for managing and ensuring calibration traceability. To mention a few requirements, consideration must be given to calibration uncertainty, calibration interval (when does the calibration expire?), and methods used to ensure that traceability stays intact in the calibration program.
For more information regarding traceability and other important metrology concepts, visit Fluke Calibration’s General Calibration & Metrology Topics technical library and metrology training pages.
Calibration Accreditation
When calibrations are performed, it’s important to be able to trust the process by which they are performed. Calibration accreditation provides that trust. Accreditation gives an instrument owner confidence that the calibration has been done correctly.
Calibration accreditation means that a calibration process has been reviewed and found to be compliant with internationally accepted technical and quality metrology requirements. ISO/IEC 17025 is the international metrology quality standard to which calibration laboratories are accredited.
Accreditation services are provided by independent organizations that have been certified to do this type of work. Every large country typically has at least one accreditation provider. For example, in the United States, the National Voluntary Laboratory Accreditation Program (NVLAP), A2LA, and LAB are accreditation providers. In England, the United Kingdom Accreditation Service (UKAS) is the accreditation provider.
International agreements ensure that once a calibration process is accredited in one country, any calibrations coming from that process can be accepted worldwide without any additional technical acceptance requirements.
Companies like Fluke Calibration maintain several certifications and accreditations.
Calibration Certificates
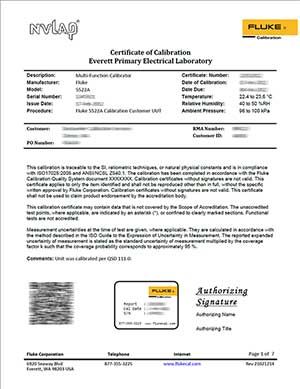
A calibration laboratory often provides a certificate with the calibration of an instrument. The calibration certificate provides important information to give the instrument’s owner confidence that the device was calibrated correctly and to help show proof of the calibration.
A calibration certificate might include a statement of traceability or a list of the calibration standards used for the calibration, any data resulting from the calibration, the calibration date, and possibly pass or fail statements for each measurement result.
Calibration certificates vary because not all calibration laboratories follow the same industry standards, and they also can vary depending on where the calibration fits within the calibration pyramid or hierarchy. For example, the calibration certificate required for a grocery store scale may be very simple, while the calibration certificate for a precision balance in a calibration laboratory may have a lot more technical content. Calibration certificates coming from an accredited calibration process have some very particular requirements which can be found in the international standard ISO/IEC 17025.
To see a calibration certificate sample up close, learn more about its format and individual elements, and read about Fluke Calibration’s process of standardizing certificates among its acquired brands, see the application note, A New Format for Fluke Calibration Certificates of Calibration.
Calibration Uncertainty
From the definition of calibration previously discussed, you’ve probably noticed that “uncertainty” (amount of possible error) rather than "accuracy" is used to describe the capability of the calibration processes and outcomes. In the test and measurement industry, accuracy is often used to describe the measurement capability of an instrument. Often the instrument manufacturer intends for an accuracy specification to represent the expected range of error that may occur when using the instrument. However, the VIM provides guidelines that "uncertainty" is the preferred term to use for describing the measurement specification of an instrument. Since uncertainty is the chosen vernacular to discuss the amount of error and is such an important concept in the calibration discussion, it deserves a bit more attention.
Let’s start with a basic definition. Uncertainty describes a range of values in which the true value can be found. For example, if a voltmeter has a measurement uncertainty of ± 0.1 V, when measuring a voltage value that appears on the display as 10.0 V, the true voltage value could be as low as 9.9 V or as high as 10.1 V. If the 0.1 V uncertainty is stated to have 95 % coverage, we can have 95 % confidence that 10V ± 0.1 V contains the true value. Fortunately, most results tend to be toward the middle of the possible range, because random uncertainties tend to follow the Gaussian distribution or normal bell curve.
With this understanding of uncertainty in mind, the calibration standard needs to be of sufficiently low uncertainty that the user has confidence in the calibration result. The calibration standard should have lower uncertainty (better accuracy) than the device being calibrated. For example, it does not make sense to calibrate a precise micrometer using a measuring tape. Similarly, it does not make sense to calibrate a high-precision precious metal scale by comparing it with a bathroom scale.
An important international metrology standard, the GUM (Guide to the expression of Uncertainty Measurement), goes one step further with the importance of uncertainty with the following statement.
“When reporting the result of a measurement of a physical quantity, it is obligatory that some quantitative indication of the quality of the result be given so that those who use it can assess its reliability.”
Essentially, the GUM states that a measurement without a known uncertainty value will have an unknown level of quality and reliability.
Uncertainties can enter the calibration equation from various sources. For example, let’s look at calibrating a temperature probe. Uncertainties can be introduced by the reference thermometer and the calibration system. Adding uncertainties of components together is referred to as an uncertainty evaluation. Some evaluations use an estimate of uncertainty that can allow many different models of temperature probes to be used, so long as they don’t exceed a budgeted value, and are therefore called "uncertainty budgets".
Here is an example of why calibration uncertainty and measurement uncertainty are an important part of our daily lives. A typical gasoline pump in the United States can pump gas with an uncertainty of about ± 2 teaspoons (0.003 gallons) per gallon. Nobody is going to be upset if they are short a couple of teaspoons of gasoline, and the gas station may not lose much money by giving away two teaspoons of gasoline per gallon sold. However, if the uncertainty of the gasoline pump is ± 0.1 gallons, you can imagine how inappropriate this level of uncertainty would be for this measurement. You could be shorted a gallon of gas for every 10 gallons that you pump. So, the reason why uncertainty is so important in calibration and measurement is that it is needed to allow the owner of the instrument or the customer of the measurement to evaluate confidence in the instrument or the measurement. It could be an interesting experiment to ask a gasoline station manager for an estimate of uncertainty for one of their gasoline pumps!
For several years, the simple "4 to 1 TUR (Test Uncertainty Ratio)" has been implemented in many calibration processes. It basically says that an appropriate uncertainty relationship between the calibration standard and the DUT should be at 4 to 1, meaning the uncertainty of the reference measurement is four times smaller than the uncertainty of the DUT.
A TUR is the ratio of the specification of the device under test (DUT) to the expanded uncertainty of measurement. This is what modern calibration laboratories use to ensure risk of producing a false accept (where the calibration results indicate that the DUT is in tolerance, but due to the measurement uncertainty, it is actually out of tolerance) or a false reject (where the calibration results indicate that the DUT is out of tolerance, but due to the measurement uncertainty, it is actually in tolerance). In the era before calibration laboratories were required to compute measurement uncertainty, the laboratory would often calculate a Test Accuracy Ratio (TAR), which is the ratio of the DUT to the specification of the reference standard used in the calibration, as a means of evaluating the adequacy of a reference standard for a calibration process. Calculating a TAR is still a good way to have a rough estimate for determining the adequacy of a reference standard for a calibration process, and then a TUR can formally be calculated after the calibration process has been completed and the formal uncertainty of measurement has been evaluated.
Calibrators
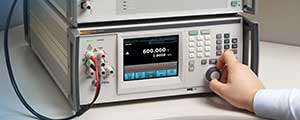
A device that calibrates other equipment is sometimes referred to as a calibrator. A calibrator is different from other types of calibration standards because it has a built-in calibration standard as well as useful features that make it easier to calibrate instruments. For example, the electrical calibrator shown here has connectors to allow a user to connect a device under test easily and safely, and buttons and menu options to help the user efficiently perform a calibration.
For a comprehensive but basic education, see our page on calibrators.
Calibration Software
Using calibration software with the calibrator allows a user to completely automate the calibration and calculate calibration uncertainty. Calibration software increases the efficiency of performing calibrations while reducing procedural errors and reducing sources of uncertainty. There is also calibration asset management software available that manages calibration equipment inventory.
Calibration Disciplines
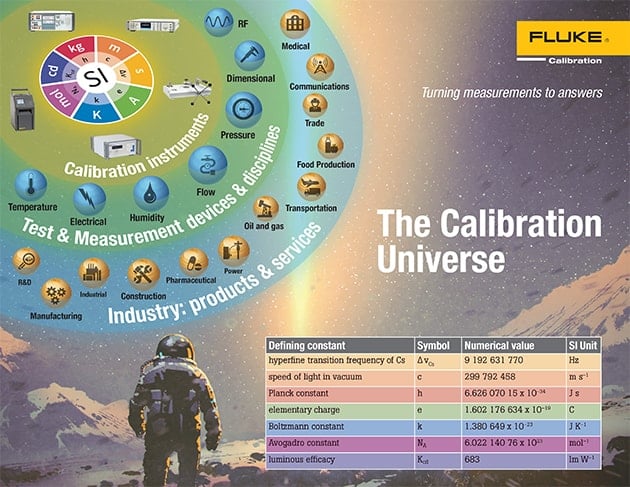
There are many calibration disciplines, each having different types of calibrators and calibration references. To get an idea of the types of calibrators and instruments that are available, see the wide array of Fluke Calibration calibrators and other calibration equipment. Common calibration disciplines include but are not limited to:
Resources
Temperature Calibration Information - general temperature calibration information page by Fluke Calibration
Introduction on the ISO Guide to the Expression of Uncertainty in Measurement (GUM) - on-demand webinar by Fluke Chief Metrologist, Jeff Gust
How is a Calibration Performed?
There are several ways to calibrate an instrument depending on the type of instrument and the chosen calibration scheme. There are two general calibration schemes:
- Calibration by comparison with a source of known value. An example of a source calibration scheme is measuring an ohmmeter using a calibrated reference standard resistor. The reference resistor provides (sources) a known value of the ohm, the desired calibration parameter. A more sophisticated calibration source like the resistor is a multifunction calibrator that can source known values of resistance, voltage, current, and possibly other electrical parameters. A resistance calibration can also be performed by measuring a resistor of unknown value (not calibrated) with both the DUT instrument and a reference ohm meter. The two measurements are compared to determine the error of the DUT.
- Calibration by comparison of the DUT measurement with the measurement from a calibrated reference standard. A variant of the source-based calibration is calibrating the DUT against a source of known natural value such as a chemical melt or freeze temperature of a material like pure water.
From this basic set of calibration schemes, the calibration options expand with each measurement discipline.
Calibration Steps
A calibration process starts with the basic step of comparing a known with an unknown to determine the error or value of the unknown quantity. However, in practice, a calibration process may consist of "as found" verification, adjustment, and "as left" verification.
Many measurement devices are adjusted physically (turning an adjustment screw on a pressure gauge), electrically (turning a potentiometer in a voltmeter), or through internal firmware settings in a digital instrument.
For example, for some devices, the data attained in calibration is maintained on the device as correction factors, where the user may choose to compensate for the known correction for the device. An example of this is RF attenuators, where their attenuation values are measured across a frequency range. The data is kept with the instrument in the form of correction factors, which the end-user applies to improve the quality of their measurements. It is generally assumed that the device in question will not drift significantly, so the corrections will remain within the measurement uncertainty provided during the calibration for the calibration interval. It is a common mistake for people to assume that all calibration data can be used as correction factors, because the short and long term variation of the device may be greater than the measurement uncertainty during the calibration interval.
Non-adjustable instruments, sometimes referred to as “artifacts”, such as temperature RTDs, resistors, and Zener diodes, are often calibrated by characterization. Calibration by characterization usually involves some type of mathematical relationship that allows the user to use the instrument to get calibrated values. The mathematical relationships vary from simple error offsets calculated at different levels of the required measurement, like different temperature points for a thermocouple thermometer, to a slope and intercept correction algorithm in a digital voltmeter, to very complicated polynomials such as those used for characterizing reference standard radiation thermometers.
The “as left” verification step is required any time an instrument is adjusted to ensure the adjustment works correctly. Artifact instruments are measured “as-is” since they can’t be adjusted, so “as found” and “as left” steps don’t apply.
A calibration professional performs calibration by using a calibrated reference standard of known uncertainty (by virtue of the calibration traceability pyramid) to compare with a device under test. He or she records the readings from the device under test and compares them to the readings from the reference source. He or she may then make adjustments to correct the device under test.
Calibration Example
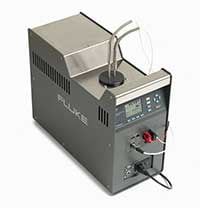
Let’s say that you use a precise thermometer to control the temperature in your pharmaceutical plant processes and you need to calibrate it regularly to ensure that your products are created within specified temperature ranges. You could send your thermometer to a calibration lab or perform the calibration yourself by purchasing a temperature calibrator, such as a liquid bath calibrator or dry-well calibrator. A liquid-bath calibrator (like the Fluke Calibration models 6109A or 7109A portable calibration baths) will have a temperature-controlled tank filled with a calibration fluid connected to a calibrated temperature display. The dry-well calibrator is similar but a metal temperature-controlled block will have measurement wells that are sized to fit the diameter of the DUT thermometer. The calibrator has been calibrated to a known accuracy. You place your thermometer, the device under test (DUT), in the calibrator tank or measurement well then you note the difference between the calibrator display and the DUT over a distributed set of temperatures within the range for which your thermometer is used. In this way, you verify if your thermometer is within specification or not. If the thermometer needs to be adjusted, you may be able to adjust the display of the thermometer, if it has one, or you can use the calibration results to determine new offsets or characterization values for the probe. If you make adjustments, then the calibration process is repeated to ensure the adjustments worked correctly and verify that the thermometer is within specification. You can also use the calibrator to occasionally check the thermometer to make sure it's still in tolerance. This same general process can be used for many different measurement devices like pressure gauges, voltmeters, etc.
Resources:
- How to Calibrate an RTD or Platinum Resistance Thermometer (PRT) - application note by Fluke Calibration
- How to Calibrate a Thermocouple - application note by Fluke Calibration
- Tools to Financially Justify Calibration Equipment - on-demand webinar by Fluke Calibration
Why is Calibration Important?
Calibration plays a vital role in maintaining operations' quality, safety, and efficiency. Uncalibrated instruments can lead to errors, wasted resources, and severe safety hazards.
Critical benefits of calibration:
- Accuracy: Guarantees precise readings, reducing errors in critical measurements.
- Safety: Minimizes risks of accidents caused by inaccurate readings, especially in sa
- Cost Savings: Reduces material waste, operational downtime, and expensive product recalls.
- Compliance: Meets international standards such as ISO/IEC 17025, which many industries require.
Regular calibration ensures your devices provide consistent results, safeguarding the integrity of your processes and products.
Types of calibration
Calibration spans a wide range of applications, depending on the instruments used. Each type is tailored to the specific requirements of the industry and device.
- Pressure Calibration
Pressure calibration ensures precise readings in environments where pressure plays a critical role, such as HVAC systems or hydraulic machinery. It is used for devices such as pressure gauges, transmitters, and manometers. - Temperature Calibration
Temperature sensors, thermometers, and thermal cameras require calibration for accurate temperature readings. This is especially vital in food processing, pharmaceuticals, and manufacturing industries. - Flow Calibration
Flow meters, used to measure the flow rate of liquids and gases, are calibrated to ensure accurate monitoring in applications such as water treatment, oil and gas, and process control. - Electrical Calibration
Electrical calibration verifies devices that measure voltage, current, resistance, and other electrical parameters. Tools like oscilloscopes, digital multimeters, and signal generators fall into this category. - Mechanical Calibration
Dimensional tools like calipers, micrometers, and force gauges are calibrated to ensure accurate physical measurements in the aerospace, automotive, and construction industries.
Each type of calibration requires specialized tools, procedures, and expertise to ensure devices meet stringent standards.
Best practices for calibration
To maximize the performance and longevity of your instruments, follow these calibration best practices:
- Adhere to Manufacturer Guidelines
Manufacturers provide recommended calibration intervals and protocols. Follow these to keep your equipment operating within optimal tolerances. - Partner with Certified Providers
Work with ISO-certified calibration services to ensure accuracy, reliability, and traceability in your calibration processes. - Document Calibration Activities
Maintain a detailed calibration history for each device. This ensures traceability for audits and helps identify trends in instrument performance.[FS3] The Fluke Calibration MET/TEAM software can be used to collect these records. - Monitor for Drift or Wear
Regularly inspect instruments for signs of drift or wear. If a device consistently drifts outside tolerances, it may need repair or replacement. - Calibrate After Repairs or Shock
If equipment experiences mechanical damage, electrical surges, or environmental stress, recalibrate it to restore accuracy. [FS4]
Calibration helps keep your world up, running and safe. Though most never realize it, thousands of calibrations are quietly conducted every day around the world for your benefit. When on your next flight or taking medication or passing a facility, you can expect that the systems and processes used to create and maintain them are calibrated regularly to prevent failure both in production and in on-going use.
Also, as discussed above, calibration fosters or improves scientific discovery, industrial manufacturing, and international trade.
To further appreciate the role precise measurements and calibration play in your life, watch this 2 1/2-minute video by Fluke Chief Metrologist, Jeff Gust. The video helps demonstrate how precise measurements assured by calibration impact your daily life in transportation.
Test and Measurement Devices Need to Be Calibrated
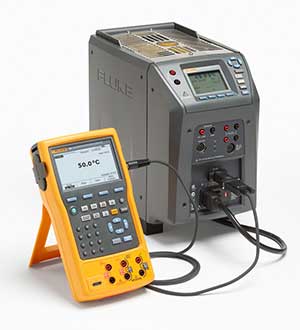
Test and measurement devices must be calibrated regularly to ensure they continue to perform their jobs properly.
Safety and compliance with industry standards, such as those enforced by the FDA in the United States, are obvious reasons for keeping test and measurement tools calibrated. However, as technology demands increase, and manufacturing costs go up, higher precision tests and measurements are moving from the calibration laboratory and onto the factory floor.
Test and measurement devices that were manufactured within specifications can deteriorate over time due to age, heat, weathering, corrosion, exposure to electronic surges, accidental damage, and more. Even the best test and measurement instruments can possess manufacturing imperfections, random noise, and long-term drift that can cause measurement errors. These errors, such as being off a few millivolts or degrees, can be propagated to products or processes being tested, with the potential to falsely reject a good unit or result or to falsely accept a bad unit or result.
Ensuring that test and measurement equipment is of sufficient accuracy to verify product or process specifications is necessary to trust and build on the results of scientific experiments, ensure the correct manufacture of goods or products, and conduct fair trade across country borders.
Calibrators Need to Be Calibrated Too
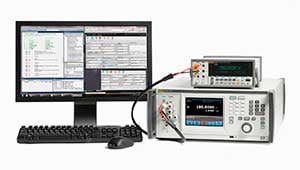
A calibrator can drift or wear from calibration tolerances over time and needs to be calibrated on a regular basis. Usually following the minimum 4:1 ratio rule, calibrators are calibrated regularly by more accurate reference standards. This process continues all the way up the calibration traceability pyramid to the most accurate calibration standards maintained by a National Metrology Institute.
Calibration ROI
Periodic calibration is usually viewed as a smart business investment with a high return on investment (ROI). Calibration eliminates waste in production, such as recalls required by producing things outside of design tolerances. Calibration also helps identify and repair or replace manufacturing system components before they fail, avoiding costly downtime in a factory. Calibration prevents both the hard and soft costs of distributing faulty products to consumers. With calibration, costs go down while safety and quality go up.
It’s important to point out that both the accuracy and cost of calibration normally declines as you move down the calibration pyramid. Lower level accuracies may be needed on a manufacturing floor as opposed to those in a primary lab. ROI is maximized by choosing calibration that matches the accuracy needed.
For more information on the significance of calibration, see our in-depth web page on Why is Calibration Important?
Resources:
- Metrology in Daily Life - video by VSL, the National Metrology Institute of the Netherlands
- Why Calibrate Test Equipment - application note by Fluke Calibration
- Why Measurements Matter - video of a speech by Fluke Chief Metrologist, Jeff Gust
- Why Calibrate - animated video by the U.S. Navy (dated but still informative & relevant)
- Fluke Instruments Keep Ferry Electronics Shipshape - a metrology case study by Fluke
- A World without Metrology - video by VSL, the National Metrology Institute of the Netherlands
- World Metrology Day Resource Center - resource center by Fluke Calibration
Where Are Calibrations Performed?

Calibrations are commonly performed at National Metrology Institutes, primary calibration labs, secondary calibration labs, and in the field at places like a manufacturer’s plant floor. Note that primary and secondary calibration labs can be owned and operated by an independent calibration service provider; a calibration company that manufactures calibration instruments, like Fluke Calibration; or a manufacturer who performs calibrations in house.
When Are Calibrations Performed?
There is no one-size-fits-all calibration schedule. Depending on how frequently you use your equipment and the accuracy required, you may need to calibrate as frequently as every month to as infrequently as every year or longer. Generally, the more critical measurements being performed, the more frequently you will calibrate. If you accidentally dropped or otherwise damaged an instrument, you will likely want to calibrate it as soon as possible.
In terms of test and measurement equipment, all electronic components and mechanical devices exhibit drift over time. To ensure your equipment always operates to a published specification, you must have it recalibrated regularly. Manufacturers of test and measurement equipment, like Fluke, provide calibration time intervals for their products. For example, Fluke product specifications are designed so that more than 95 percent of the population for a given model will meet all specification at the end of its published calibration interval. The most common time interval is one year.
But what if equipment drifts between calibrations? If so, everything measured between the calibration periods is now suspect. To solve this problem, a common practice is to perform intermediate checks per ISO 17025, also known as equipment verification. Learn more at our blog post about intermediate checks and the difference between calibration vs verification.
Resources:
- Establishing Calibration Intervals for Fluke Products - application note by Fluke Calibration
- Establishing Correct Calibration Intervals - application note by Fluke Calibration
- Calibration Intervals, A Manufacturer’s Perspective - application note by Fluke Calibration
- Guidelines for the determination of calibration intervals of measuring instruments – publication by ILAC
Who Performs Calibrations?
People who perform calibration in laboratories include:
- Metrologists
- Lab managers
- Calibration engineers
- Calibration technicians
People who perform calibration work in the field include:
- Manufacturing engineers
- Instrument technicians
Calibration Salaries
For information on annual salaries earned by people in the calibration industry, see our Calibration and Metrologist Salary Survey results.
Keep learning
For additional calibration and metrology information and training, see The Fluke Calibration Education Hub page.
Not subscribed yet? Join the Fluke Calibration email list – see the benefits and subscribe here.
Related products
Get help
Speak with a calibration product expert about your equipment needs
Looking for calibration information for consumer products?
- Monitor / Printer
- TV
- Scale
- Camera
- Phone
- Watch
- Oven
- Refrigerator
Don't see your product in the list above? Try doing an internet search via Google or your search engine of preference on "how to calibrate [your specific product]". For example, if you're looking to calibrate a Ford F150 speedometer you could search on "how to calibrate a Ford 150 speedometer". If instructions didn't come up for the F-150, you could generalize your search to "how to calibrate a Ford speedometer" or "how to calibrate a speedometer".
Frequently asked questions about calibration
What does calibration mean?
Calibration is comparing a device’s measurements to a standard to verify and adjust its accuracy.
What does it mean to calibrate something?
Calibrating something means ensuring it produces accurate and consistent results by comparing its reading with a reference standard.
What is the calibration of a measuring instrument?
It’s the process of testing a measuring instrument to ensure it operates within acceptable accuracy ranges.
What does calibrating mean in electronics?
In electronics, calibrating means testing and fine-tuning devices to measure electrical parameters accurately, ensuring they deliver reliable data.